Pages

Sunday 22 January 2012

Projects

Today I am making a list of all the home projects I want to get done...most are for decorative purposes, others are just to turn what we have into nicer versions of themselves...so here is the list of what is to come:

1)  Dog beds, right now we have a piece of foam wrapped in an old comforter for the dogs to sleep on...so yes we would like nicer versions of these, since that is the reason we bought the foam in the first place. I think I will make a pattern for those today.


2) Bedroom wall art. I already have an idea for what will go on the wall over the bed, I just need to make it happen. This will (hopefully) be another easy peezy DIY!


3) Covering my drawers. Right now I have one of those plastic drawers that you can get from Canadian Tire in our room, that is where I keep my pants and such, but let me honest plastic drawers aren't exactly chic like my newly painted bedroom. So stay tuned to see how I manage to turn these into something glamorous!


4) Kitchen wall art. Inspired by Swakes (she commented on a few of my posts) this will no doubt take a little longer, but I think you will all love the DIY approach to this one. 


5) Since we rent, we can't exactly change the fact that our doors are wood. I will devise a creative way to make this happen in the studio, since I think the closet doors are a bit too much on the space.


6) Photo display. The boyfriend is really into taking photos and such, and we happen to have this left piece of board (I think it was from the last tenants bed frame). There were 3, one has been transformed into my studio desk, that I painted white. Another is the office desk, but still needs a coat of paint, likely the same colour as the bricks in this room. The third will be our photo display! I need a bit of money before I make this one happen the way I want...hence why it is at the end of the list!


I am sure I will be coming up with many more projects, DIYs, and other ideas! This is just the list so far! What should I start with?


Friday 20 January 2012

Just add paint and fabric!

Revamping furniture has become a big thing around our place, seeing as how our budget is ultra tight...


This was the chair I had been using for the past 3 years as a stool to paint walls when my arm length just wouldn't suffice. It's covered in paint drips and the seat is just old and yucky looking, but now that we have agreed to NOT change apartments for a while, I figured I'd give this old chair a new look. I won't be painting anytime soon; all my rooms have received their fresh coats/looks!

Check it out: OLD CHAIR


 Removed the seat, and gave it a fresh coat of white paint...leftover from the walls. 


Used a staple gun and some fabric I had laying around to recover the seat.


And here it is! New looking chair that matches both the kitchen and the studio, so I won't feel as broke when I have guests for dinner. Now my chair looks like it belongs!


P.S: Yes it is an old tee shirt that I am using to keep the paint from dripping on the floor...at least I hope it's an old tee shirt...maybe don't tell the boyfriend!

Easy Motivational Art

DIY easy peezy lemon squeezy...

First step is to choose your motivational word art!

I chose:
LIVE what you LOVE
It really fits the vibe in our place, the boy and I are all about working doing what you love, we figure money will follow...

I used illustrator to make the layout and choose colours:


I then printed my images and cut them to size:


Put them in frames and voilĂ !


Now to go out and buy the little hooks to hang them on the wall. These are for the bathroom, I figured the best place for motivation; we end up in there every morning!


And voilĂ , hanging on our yellow wall!


Tuesday 17 January 2012

Scarves, scarves and scarves...

If you own a zillion and one scarves like me, organizing them, and knowing what you have can be difficult. Here is a quick idea that my boyfriend came up with. Also, it adds colour to our bedroom...which I really appreciate. There are a ton of scarves on mine, but you could organize yours however you like! It's simple really!


This was made using a left over bar from an armoir that we had and some embroidery thread that I happen to have laying around. I decided the length I needed and looped it a few times for strength, tied each end in a knot, and threaded it through the bar. The loops of the thread are attached to 2 screws in the wall add a bunch of  scarves and voila! If you organized it better, you could have it flow by colour, or length. I prefer the over abundance look and have just thrown them on there! Just a quick solution to the endless searching through my closet every day, hoping to find the one I want to wear!

Monday 16 January 2012

Jewelry wall art

Jewelry, what a silly word, but I'm crazy about the stuff! So when I came home one day and the boyfriend had all mine on display I was crazy about that and even more crazy about him! Check out below the creative way the boy cleaned up my piles of jewelry:


It's actually an old vintage screen from a window. He found it in our last apartments storage unit, and cleaned it for me. he added a few nail along the center piece to hang my necklaces, and attached a cord to the back so it could hang like art on the wall. I love it, and it's really a great way to keep all my earrings and necklaces organized and easy to find! It would be an easy DIY as you could build the frame, or use the frame from a canvas, and then attach the screen with a staple gun. (Mesh screen is available at local hardware stores.) 

Sunday 15 January 2012

Just add paint...

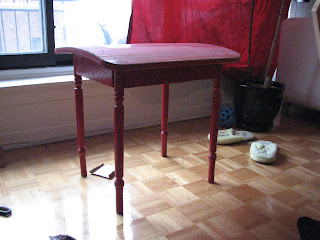
I really love the way a little paint can transform something you thought was garbage into a new piece you will actually use. Check out our little table that we saved from the trash.


BEFORE:


It took a bit of sanding to remove all the paint that was stripping away and you can see the way the weather has warped the top. We don't mind, the table is just to have an added end table in our living room, so our table fogger isn't hanging out on the ground!


AFTER:


And yes this is the same yellow paint that I have now used in my studio, kitchen and bathroom. I am getting my $8 worth from this second hand paint!

Friday 13 January 2012

DIY Dog Winter Jacket

Upcycled Men's Lumberjack Shirt
(This one is complete with cotton batting, for evtra warmth for my skinny dog.)

Level of difficulty: Let's say hard.

What you will need:
-1 Men's Shirt extra thick for warmth if you are going to make it for winter. 
(I picked this one up for $2 when my neighbor was having a garage sale this summer)
-Fabric Sheers/Scissors
-Rib Fabric (I used black to match, and because I had it on hand) 
-Sewing machine (and I also used my serger)
-Fabric chalk


To start, I put the jacket around my dog, with the top button done up, so I could trace my pattern to custom fit him. (Only drew on one side since I will cut on the fold)


Can you see the white line? I drew starting from his back end,down and around, to leave room for him to still go to the bathroom, levelled off where I thought would be a good length on each side. Also, I traced from the from neck to make sure I had enough coverage on his chest. (He is really skinny and shivers a lot in the snow.)


I then cut, leaving more than enough (1.5") for seam allowance, so that my fabric would lie flat without the arms in the way.


I folded in half so that I can cut evenly to match each side. See below, I darkened my chalk line so you can see what shape suits my dogs. Also, I straightened out my line where the ribbing will attach under his body.


I then cut leaving 1cm for seam allowance. Be careful if you are also using a fabric with layers like the quilting I chose, as you might want to pin the layers together so they do not shift when you are cutting.


I tried it on him, so I could see how it fit, before moving on. I love it!


I switched it to its back, so I could figure out the next piece. I measured Troy (the dog) around his belly (21") and then around his chest (22") so that I would know how big/small to make the ribbing. I also measured the length I would need to connect the from chest to the finished length at his belly. (7.5")

I sort of skipped taking a picture of the next step, but will explain how and if you need more details, shoot me an email. He is 21" around at the belly, and my checkered fabric reaches 15" after seam allowance, I needed 6" to make up the difference in his size. Using ribbing you need to subtract for the stretch, so I used a total of 6" including seam allowance for that measurement.  I marked on my folded rib fabric the end point (A), and measured up 3"(B). Then I marked the length, 7.5" (C) marked my 2" for the front chest (total 4")(D) and then marked the distance to the chest (4.5")(E) and the 5" (total for 10") (F) for the chest point. I then connected all the points, and cut along the line, because I was including my seam allowance in the measurement. Here is a diagram to help with all the wordiness I just typed: 


I pinned it in place, and basted it in place, being careful to leave the armholes open.


I then tried it on my pup. One of the armholes I had stitched a little too tight, but since it was basted I pulled out the few stitches and made it more comfortable for him. Doesn't he look like a stud?

I stitched my seams, serged the seams and edges, and hemmed the hole thing. Once it was to this stage, I tried it on him again, this time because the edges were hemmed and stiffer it was bubbling up at his butt, so I created a dart so it would wrap around him a bit better. The boyfriend suggested attaching one of the pockets from the shirt, and that it could double as a plastic bag pocket, so we can always have a stash when we go to the park!


 FINAL FRONT AND BACK! What do you think?
PS we stand our pup up and put his front legs in first then pull the shirt over his head. He is a very patient pup!


If you make your own I would love to see photos and hear what your dog thinks?

All warm and cozy with a nose full of snow!


Sometimes being warm isn't so fashionable...

Montreal in the winter = fashionable winter, for the most part. I mean you walk downtown and these people have really got it together, they understand that winter doesn't mean you have to bundle up in rags, you can bundle up in some very nice winter jackets. A lot out there now are down filled, and good looking! 


However, I do feel pretty bad when I take my dogs out, because they whine after 5 minutes with the salt and ice,  so we (boyfriend and I) didn't have much choice but to get them winter boots of their own. If you have dogs, and you have ever tried boots on them, then you know how terribly funny it is, so I really get a small lift of joy every time we walk them outside! It really helps brighten your mood before a walk through a storm...


Please meet Argos (named for the Odysseus' faithful dog in Greek mythology.) Not to be confused with anyone who would name their dog after the Toronto Argonauts...I am not a fan of them. GO ALOUETTES! That's right I said it! Isn't he adorable in his boots?


And please me Troy (also named from Greek mythology, but is the name of a city) A little more awkward in his boots, but agile all the same!


And to be honest I don't think that the other dogs make fun of them. I mean they aren't children, even tho we treat them like they are! A lot of the people we pass when we walk them either compliment them, or ask where we bought them. Yesterday some lady honked at me to get my attention just so she could ask. Clearly finding boots for her dog is a top priority!

Thursday 12 January 2012

Pink to Sunny

My pink room, the room I discussed becoming the creativity space where I can create and be creative. Well it is underway, 3 coats of white paint later and that wrong shade of pink has been covered, which was a lot of work considering you can tell that whoever painted that pink did a quick one coat...I had to do 3 just to hide it. Alas, it is done! The painting, not the room. It is underway, and needs some shelving or something to help with organization, but we will get to that when we can, and can afford it! I am not sure if I mentioned that I am in my 20's (late 20's but still my 20's) and my boyfriend, who I live with, is a full time student; just want to point out that we are not swimming in allowance for shelving, we prefer to eat among other things.

This is the start, it had a long way to go, but not as long as it did 5 days ago. I am happy that the paint is done, I also painted the table top, that still needs real legs, so that my bins can be useful storage again.


Behind the door, which I did not photograph, we hung up some hooks for our broom, swiffer, mop, & vacuum. I just wanted to share that, so that you all know we actually own those things. 


Unfortunately this room is home to all objects with no home in the apartment (ie: the fan) so it will stay there, because there is where I put it. I might move it to the left, or maybe to another corner, but yes in that room is where it will stay, until summer hits and we try to cool ourselves. 
(P.S: I love that this photo hides the fact that it is winter outside, so that makes me happy, I can look and pretend it is only fall, because I love fall!)

Wednesday 11 January 2012

Makeshift bar...

Because when life gives you lemons...you add vodka! (At least I am sure Chelsea Handler would agree with me!) Either way, I like to have a bar in my home, but since I rent I can't exactly do all sorts of construction to make a real authentic one, you know. Instead I stick to makeshift versions of the real thing. In our last apartment, we had this random inlet spot with a skylight. It also had a window that opened into our dining room, clearly I turned that space into my bar. That might have been the best thing about that place...sad really, but clearly a reason we didn't stay there. And since this new apartment doesn't have a similar random inlet spot and definitely no skylights...since there is an apartment above us here, I had to make do with what we had. Lucky for me, there is a random corner shelf type of thing in our kitchen. So low and behold, new bar area! I don't know why but I really like to have all my glasses and alcohol on display. It's not complete, I would still like to make some sort of wine rack for underneath, and it really needs some art, or mirrors...I am working on that!

Yes, I know there is not that much alcohol hanging out on display, but let's be honest does anyone in their 20's have alcohol consistently on display?

(I'd like to add that the baby keg thing on top is actually a handmade, from bamboo, shot dispenser that comes with it's own bamboo shot glasses. The boyfriends Mom got that for me, so let's see, does she know me? Better then one would think considering we don't speak the same language, but more about that later!)

Bricklayer of sorts...

I wanted to share the final look of my brick wall (thanks to Martha) keep in mind this is the first time I have done this, so don't stare too closely or you will no doubt see all the slanted ones, and mistakes...but I LOVE the end result, so there!


It was tricky to do the second row from the top, because I didn't have the ceiling to keep me straight, and my chair only got me so high to see just below the top of sponge stamp...so there was a bit of guess work. (And maybe a boyfriend sitting back trying to tell me, left side higher, no too high...etc. Thanks)


I know you can tell it is painted when you look at all the edges, but really for a first glance I am impressed with the feel!


Now to keep the room this tidy...that will be a project in itself!
Cheers!

Saturday 7 January 2012

Side tracked by Martha Stewart


Today I was going to start emptying my "pink room" but since my master bedroom was already started I figured I would set out to finish that...I do like to have more then one project happening at the same time, why have one room smell like paint when you can have all of them? So with the master underway and the  light grey paint already opened I set forth on another project today: the living room. Like I mentioned previously we like to get our paint second hand at the Habitat for Humanity in our area (all returned paint to Home Depot.) Needless to say 'you get what you get' and we strive to get more than one use from it; more than one project from a can sort of deal. Today's beginner project was found here at Martha Stewart. I was using light grey for some of the bedroom walls, perfect to add some water and then sponge it on as my grout look for the bricks I will be painting.


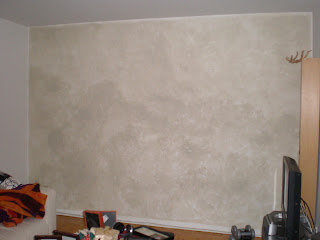
This is my clean slate wall, although I am not sure what the white is floating in the middle, something to do with my flash I am sure:


On Martha's site she pretty much jumps to how to make the bricks; this is me making the grout look. Sponge, paint, water, sponge, paint, water...you get the drift...


Apply to the wall in dabbing motions, I tried to just swipe it on, but felt that dabbing really gave the overall texture I was aiming for.


Here is the finished grout look, I know it is darker in some spots but I am not worried since the bricks will cover the majority of the wall in the end. Plus grout isn't so perfect on brick walls, right?


As for the master bedroom, 3 of 4 walls are complete. The fourth is going to be a different colour, which we did buy, but when I painted the first tid bit on the wall, I decided the colour looked a disgusting, so I will be going back to exchange it for another colour. Eventually I will show you all that room too, but it's really not close to being finished.

Thursday 5 January 2012

Vision:

So I have been inspiring myself with design ideas, and think that the "pink room" might take a while to get under control, but today I did move somethings around and removed a few. I wanted to share my design ideas/inspiration for the room. I am sure there will be more, but figured that we all need to start somewhere, and who knows maybe me de-cluttering my room will help you to do the same...2012 the year of de-clutter. (I don't care if that is a word or not, I am using it multiple times throughout my post!)

Who is to say what my room will turn out like, but at least I have somewhere that I am heading with it!


I would like to point out that I like how the magazine storage containers have been attached to the shelf above.


I think that a bold colour for one wall, since the room is small, is a positive creative addition. The rest of the room will be white, but I don't know that I will necessarily use this blue. I tend to get a lot of my supplies at the Habitat for Humanity in my area. Saves money for one, helps charity and I like to think that it helps the environment, because what else are they going to do with all that paint that is returned to Home Depot. So I buy it and use it; can't beat $8 for a gallon of paint.


I really like the chalkboard idea, but might get messy in my space with fabrics and all. However, the bins and shelves are a great look.


I already have a cork board, but adding an enlarged frame could be a great way to add focus in the room...we'll see.


Love the clipboard idea, plus you can get the clipboards at the dollar store, so bonus there. Clearly I am on a budget! 

(All pictures are from www.style-files.com > inspiration for workspace section)

I also have a few DIY ideas, but want to keep them aside till I can show you the steps with the final product! Let's hope I get on them sooner than later... so what do you think?