Pages

Showing posts with label painting. Show all posts

Sunday, 22 January 2012

Projects

Today I am making a list of all the home projects I want to get done...most are for decorative purposes, others are just to turn what we have into nicer versions of themselves...so here is the list of what is to come:

1)  Dog beds, right now we have a piece of foam wrapped in an old comforter for the dogs to sleep on...so yes we would like nicer versions of these, since that is the reason we bought the foam in the first place. I think I will make a pattern for those today.


2) Bedroom wall art. I already have an idea for what will go on the wall over the bed, I just need to make it happen. This will (hopefully) be another easy peezy DIY!


3) Covering my drawers. Right now I have one of those plastic drawers that you can get from Canadian Tire in our room, that is where I keep my pants and such, but let me honest plastic drawers aren't exactly chic like my newly painted bedroom. So stay tuned to see how I manage to turn these into something glamorous!


4) Kitchen wall art. Inspired by Swakes (she commented on a few of my posts) this will no doubt take a little longer, but I think you will all love the DIY approach to this one. 


5) Since we rent, we can't exactly change the fact that our doors are wood. I will devise a creative way to make this happen in the studio, since I think the closet doors are a bit too much on the space.


6) Photo display. The boyfriend is really into taking photos and such, and we happen to have this left piece of board (I think it was from the last tenants bed frame). There were 3, one has been transformed into my studio desk, that I painted white. Another is the office desk, but still needs a coat of paint, likely the same colour as the bricks in this room. The third will be our photo display! I need a bit of money before I make this one happen the way I want...hence why it is at the end of the list!


I am sure I will be coming up with many more projects, DIYs, and other ideas! This is just the list so far! What should I start with?


Friday, 20 January 2012

Just add paint and fabric!

Revamping furniture has become a big thing around our place, seeing as how our budget is ultra tight...


This was the chair I had been using for the past 3 years as a stool to paint walls when my arm length just wouldn't suffice. It's covered in paint drips and the seat is just old and yucky looking, but now that we have agreed to NOT change apartments for a while, I figured I'd give this old chair a new look. I won't be painting anytime soon; all my rooms have received their fresh coats/looks!

Check it out: OLD CHAIR


 Removed the seat, and gave it a fresh coat of white paint...leftover from the walls. 


Used a staple gun and some fabric I had laying around to recover the seat.


And here it is! New looking chair that matches both the kitchen and the studio, so I won't feel as broke when I have guests for dinner. Now my chair looks like it belongs!


P.S: Yes it is an old tee shirt that I am using to keep the paint from dripping on the floor...at least I hope it's an old tee shirt...maybe don't tell the boyfriend!

Sunday, 15 January 2012

Just add paint...

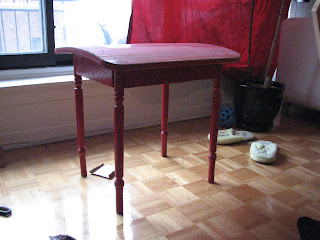
I really love the way a little paint can transform something you thought was garbage into a new piece you will actually use. Check out our little table that we saved from the trash.


BEFORE:


It took a bit of sanding to remove all the paint that was stripping away and you can see the way the weather has warped the top. We don't mind, the table is just to have an added end table in our living room, so our table fogger isn't hanging out on the ground!


AFTER:


And yes this is the same yellow paint that I have now used in my studio, kitchen and bathroom. I am getting my $8 worth from this second hand paint!

Thursday, 12 January 2012

Pink to Sunny

My pink room, the room I discussed becoming the creativity space where I can create and be creative. Well it is underway, 3 coats of white paint later and that wrong shade of pink has been covered, which was a lot of work considering you can tell that whoever painted that pink did a quick one coat...I had to do 3 just to hide it. Alas, it is done! The painting, not the room. It is underway, and needs some shelving or something to help with organization, but we will get to that when we can, and can afford it! I am not sure if I mentioned that I am in my 20's (late 20's but still my 20's) and my boyfriend, who I live with, is a full time student; just want to point out that we are not swimming in allowance for shelving, we prefer to eat among other things.

This is the start, it had a long way to go, but not as long as it did 5 days ago. I am happy that the paint is done, I also painted the table top, that still needs real legs, so that my bins can be useful storage again.


Behind the door, which I did not photograph, we hung up some hooks for our broom, swiffer, mop, & vacuum. I just wanted to share that, so that you all know we actually own those things. 


Unfortunately this room is home to all objects with no home in the apartment (ie: the fan) so it will stay there, because there is where I put it. I might move it to the left, or maybe to another corner, but yes in that room is where it will stay, until summer hits and we try to cool ourselves. 
(P.S: I love that this photo hides the fact that it is winter outside, so that makes me happy, I can look and pretend it is only fall, because I love fall!)

Wednesday, 11 January 2012

Bricklayer of sorts...

I wanted to share the final look of my brick wall (thanks to Martha) keep in mind this is the first time I have done this, so don't stare too closely or you will no doubt see all the slanted ones, and mistakes...but I LOVE the end result, so there!


It was tricky to do the second row from the top, because I didn't have the ceiling to keep me straight, and my chair only got me so high to see just below the top of sponge stamp...so there was a bit of guess work. (And maybe a boyfriend sitting back trying to tell me, left side higher, no too high...etc. Thanks)


I know you can tell it is painted when you look at all the edges, but really for a first glance I am impressed with the feel!


Now to keep the room this tidy...that will be a project in itself!
Cheers!

Saturday, 7 January 2012

Side tracked by Martha Stewart


Today I was going to start emptying my "pink room" but since my master bedroom was already started I figured I would set out to finish that...I do like to have more then one project happening at the same time, why have one room smell like paint when you can have all of them? So with the master underway and the  light grey paint already opened I set forth on another project today: the living room. Like I mentioned previously we like to get our paint second hand at the Habitat for Humanity in our area (all returned paint to Home Depot.) Needless to say 'you get what you get' and we strive to get more than one use from it; more than one project from a can sort of deal. Today's beginner project was found here at Martha Stewart. I was using light grey for some of the bedroom walls, perfect to add some water and then sponge it on as my grout look for the bricks I will be painting.


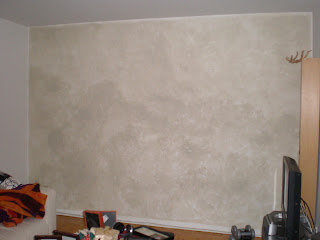
This is my clean slate wall, although I am not sure what the white is floating in the middle, something to do with my flash I am sure:


On Martha's site she pretty much jumps to how to make the bricks; this is me making the grout look. Sponge, paint, water, sponge, paint, water...you get the drift...


Apply to the wall in dabbing motions, I tried to just swipe it on, but felt that dabbing really gave the overall texture I was aiming for.


Here is the finished grout look, I know it is darker in some spots but I am not worried since the bricks will cover the majority of the wall in the end. Plus grout isn't so perfect on brick walls, right?


As for the master bedroom, 3 of 4 walls are complete. The fourth is going to be a different colour, which we did buy, but when I painted the first tid bit on the wall, I decided the colour looked a disgusting, so I will be going back to exchange it for another colour. Eventually I will show you all that room too, but it's really not close to being finished.